Hello,
How is everyone doing? Tomorrow is a very important day for the people in United States. I really hope that those of you who are eligible to vote will vote. I do not care which party you choose but please vote. I will be voting as well but I won't disclose my preference (drama free zone). I am also volunteering to be a poll worker and good news is that I am stationed at a Fire Station (Super Hot Firemen :D). The only downside in that I will be there from 6 in the morning till 9 at night.
For this, I applied 2 costs of Essie Blanc. On accent finger, I made a Democrat sign using Primary Red and Deep Ultra Blue and for the white dots I used .015" white hex glitters. Using the same colors I drew the Republican sign on my middle finger. On the remaining fingers and thumb I drew stripes using the Red acrylic paint and on top of the one-third of the nail I used blue acrylic paint and applied silver holographic stars.
Showing posts with label Glitter. Show all posts
November 5, 2012
Democrats Vs. Republicans
Labels:
Acrylic Paint,
Blue,
Essie,
Freehand,
French Tip,
Glitter,
Red,
White
November 1, 2012
The Battle Nail Polish Challenge Day 1
Hello,
I am so excited to be a part of The Battle Nail Polish Challenge as it has been a really long time since I last participated in a nail challenge. This is my first post for the this Challenge. The theme for today's nails was to create a green and blue manicure. I really like how this manicure turned out. I hope you guys like it too.
For this, I applied 2 coats of Zoya Song. Then applied Best Glue Ever on all the nails, which I thinned down with water to almost 30-40% as it is easy to apply when thinned down. After the glue dried (it becomes transparent) I applied 1 mm neon green glitters on the tips of all the fingers except the ring finger on which I drew the spiral design using the same glitters.
September 19, 2012
Bling It On
Hello,
I have a big surprise coming for you guys. I do not want to disclose it right now but I will post about this surprise on my Facebook page within a couple of weeks. I got a request for doing nails using rhinestones over nude polish. This is a very easy design and if you do not have glue you can use topcoat to adhere the rhinestones and glitters. Also, it looks much more color coordinated in person as the gold square glitters reflect a lot and do not show their true color in pictures.
For this, I applied 2 coats of Zoya Minka. Then applied Best Glue Ever on all the nails, which I thinned down with water to almost 30-40% as it is easy to apply when thinned down. After the glue dried (it becomes transparent) I applied 2 mm gold square rhinestones on the accent nail and on other fingers I applied 1.5 mm gold square glitter.
I have a big surprise coming for you guys. I do not want to disclose it right now but I will post about this surprise on my Facebook page within a couple of weeks. I got a request for doing nails using rhinestones over nude polish. This is a very easy design and if you do not have glue you can use topcoat to adhere the rhinestones and glitters. Also, it looks much more color coordinated in person as the gold square glitters reflect a lot and do not show their true color in pictures.
For this, I applied 2 coats of Zoya Minka. Then applied Best Glue Ever on all the nails, which I thinned down with water to almost 30-40% as it is easy to apply when thinned down. After the glue dried (it becomes transparent) I applied 2 mm gold square rhinestones on the accent nail and on other fingers I applied 1.5 mm gold square glitter.
August 19, 2012
Carousel over Zoya Creamy
Hello,
How is everyone doing? Well I am having too much fun creating franken polishes. Today's post is about the new franken I created last week. With the help of other frankeners I named it Carousel. I really like how Carousel turned out. I hope you guys like it too.
For this, I applied 2 coats of Zoya Creamy. Then applied one coat of Carousel which is created by me. Carousel consists of pink, blue, orange, green, and purple glitters of different sizes and shapes in a yellow jelly base. You can see the bottle as well as macro shot of the polish at the bottom.
How is everyone doing? Well I am having too much fun creating franken polishes. Today's post is about the new franken I created last week. With the help of other frankeners I named it Carousel. I really like how Carousel turned out. I hope you guys like it too.
For this, I applied 2 coats of Zoya Creamy. Then applied one coat of Carousel which is created by me. Carousel consists of pink, blue, orange, green, and purple glitters of different sizes and shapes in a yellow jelly base. You can see the bottle as well as macro shot of the polish at the bottom.
July 13, 2012
Fierce Red Tips
Hello,
Today I have another nail foil mani. I like how the foils can transform your simple mani into something so gorgeous. I love the tips so much in this mani that I might do more looks like this in the future. Click here if you want to check my last post on nail foils.
For this, I applied one coat of Zoya Bela. After it dried, I made a french tip using Essie Fishnet Stocking. Then using a Konad image plate M25 and RA 118 (picture of the plates at bottom) I stamped the roses using Sally Hansen Insta Dri Rapid Red and drew some leaves using Holly Green acrylic paint. On the tips, I applied Best Glue Ever which I thinned down with water to almost 30-40% as it is easy to apply when thinned down. After the glue dried (it becomes transparent) I applied the metallic red nail foil. Then using a Q-tip I rubbed over the foil so that it attaches itself properly. After that I applied Wet N Wild top coat because for some reason fast drying top coat does not work well with the foils, at least not for me. In the end I applied Seche Vite top coat on all the fingers.
Today I have another nail foil mani. I like how the foils can transform your simple mani into something so gorgeous. I love the tips so much in this mani that I might do more looks like this in the future. Click here if you want to check my last post on nail foils.
For this, I applied one coat of Zoya Bela. After it dried, I made a french tip using Essie Fishnet Stocking. Then using a Konad image plate M25 and RA 118 (picture of the plates at bottom) I stamped the roses using Sally Hansen Insta Dri Rapid Red and drew some leaves using Holly Green acrylic paint. On the tips, I applied Best Glue Ever which I thinned down with water to almost 30-40% as it is easy to apply when thinned down. After the glue dried (it becomes transparent) I applied the metallic red nail foil. Then using a Q-tip I rubbed over the foil so that it attaches itself properly. After that I applied Wet N Wild top coat because for some reason fast drying top coat does not work well with the foils, at least not for me. In the end I applied Seche Vite top coat on all the fingers.
Labels:
Acrylic Paint,
Essie,
Foil,
Freehand,
French Tip,
Glitter,
Glue,
Konad,
Red,
Red Angel,
Sally Hansen,
Stamping,
Zoya
July 4, 2012
July 4th Nails
Hello,
Happy 4th of July everyone. I am very excited to start blogging again as it has been a really long time since I last blogged. A lot of things happened in the past couple of months. First, I graduated with my bachelors degree. Second, I shifted to a new place. Also, I have been planning to write a blog for about two weeks now but could not make up my mind which design or shade to blog about (kinda anxious I guess). 4th of July seemed like a perfect opportunity to start blogging again.
I started franking after getting annoyed and frustrated with the process of purchasing some of the indie polishes. At present, I am making polishes just for personal use (you never know what the future holds).
For this, I applied 2 coats of Zoya Trixie. Then applied one coat of Patriot which is a created by me. Patriot consists of blue, red, white and silver glitters of different sizes and shapes and it also consist of small blue stars in a clear base. This is my first franken and I am really satisfied with it. You can see the bottle as well as macro shot of the polish at the bottom.
Happy 4th of July everyone. I am very excited to start blogging again as it has been a really long time since I last blogged. A lot of things happened in the past couple of months. First, I graduated with my bachelors degree. Second, I shifted to a new place. Also, I have been planning to write a blog for about two weeks now but could not make up my mind which design or shade to blog about (kinda anxious I guess). 4th of July seemed like a perfect opportunity to start blogging again.
I started franking after getting annoyed and frustrated with the process of purchasing some of the indie polishes. At present, I am making polishes just for personal use (you never know what the future holds).
For this, I applied 2 coats of Zoya Trixie. Then applied one coat of Patriot which is a created by me. Patriot consists of blue, red, white and silver glitters of different sizes and shapes and it also consist of small blue stars in a clear base. This is my first franken and I am really satisfied with it. You can see the bottle as well as macro shot of the polish at the bottom.
March 29, 2012
Black and White Challenge Day 10
Hello,
I am so excited that my spring break started. I have the whole next week off which is awesome. I apologize again for not uploading this post yesterday because I was on road going back to my parents home. It feels really good to be back home. It is so hard to believe that this was the last nails design for the Black and White nail challenge. I had so much fun doing this nail challenge and I enjoyed looking at the designs of all the girls who were participating in this challenge.
For this, I uploaded a step by step tutorial for you. I think this is most hardest design I have ever done on nails. But I love garfield so I loved every bit of it. I did this design a couple of days ago for a nail challenge which I did not win.
PS: I have a giveaway going on right now. Enter here.
I am so excited that my spring break started. I have the whole next week off which is awesome. I apologize again for not uploading this post yesterday because I was on road going back to my parents home. It feels really good to be back home. It is so hard to believe that this was the last nails design for the Black and White nail challenge. I had so much fun doing this nail challenge and I enjoyed looking at the designs of all the girls who were participating in this challenge.
For this, I uploaded a step by step tutorial for you. I think this is most hardest design I have ever done on nails. But I love garfield so I loved every bit of it. I did this design a couple of days ago for a nail challenge which I did not win.
PS: I have a giveaway going on right now. Enter here.
Labels:
Acrylic Paint,
Cartoon,
Freehand,
Glitter,
Nail Challenge,
OPI,
Tutorial,
White
March 25, 2012
Black and White Challenge Day 9
Hello,
This is my ninth post for the Black and White Nail Challenge. The theme for today's nails was water marbling. It is hard to believe that this nail challenge is almost over, only one more nail challenge day left. This is the first time I did water marbling and I had such a hard time. I experimented with so many polishes that did not work at all.
For this, I applied 2 coats of Essie Blanc. After it dried I started working on the water marbling. This is the order I used the Polishes for water marbling: Zoya Raven, Essie Blank, Zoya Trixie, China Glaze Adore, and at last China Glaze Admire. I really like how my ring finger turned out but other than that it is a mess especially my pinkie and index finger. Hopefully with practice I will get better at this.
PS: I have a giveaway going on right now. Enter here.
Labels:
Black,
Blue,
China Glaze,
Essie,
Glitter,
Nail Challenge,
Pink,
Silver,
White,
Zoya
March 19, 2012
Black and White Challenge Day 7
Hello,
This is my seventh post for the Black and White Nail Challenge. The theme for today's nails was to create a manicure using black, white, and glitters. I am still not feeling well but much better than yesterday. Yesterday, I was so miserable that I went to doctor first thing in the morning and I can see a little improvement. Hopefully tomorrow will be better.
For this, I applied 2 coats of Essie Blanc. Then waited for it to completely dry and placed a scotch tape covering one-third of the nail at the bottom and applied Zoya Trixie. I removed the scotch tape when the polish was still wet as it doesn't give thick edges. After Trixie dried, I again applied a scott tape covering the two-thirds of the nail at the bottom and applied Wet N Wild Black Cream and removed the tape when the paint was still wet. It is very important to have nail polish completely dry before you apply scott tape otherwise the polish will stick to the tape when you will try to remove it and will ruin your manicure.
This is my seventh post for the Black and White Nail Challenge. The theme for today's nails was to create a manicure using black, white, and glitters. I am still not feeling well but much better than yesterday. Yesterday, I was so miserable that I went to doctor first thing in the morning and I can see a little improvement. Hopefully tomorrow will be better.
For this, I applied 2 coats of Essie Blanc. Then waited for it to completely dry and placed a scotch tape covering one-third of the nail at the bottom and applied Zoya Trixie. I removed the scotch tape when the polish was still wet as it doesn't give thick edges. After Trixie dried, I again applied a scott tape covering the two-thirds of the nail at the bottom and applied Wet N Wild Black Cream and removed the tape when the paint was still wet. It is very important to have nail polish completely dry before you apply scott tape otherwise the polish will stick to the tape when you will try to remove it and will ruin your manicure.
Labels:
Black,
Essie,
Glitter,
Nail Challenge,
Scotch Tape,
Silver,
Wet N Wild,
White,
Zoya
March 17, 2012
St. Patricks Day Nails
Hello,
Happy St. Patricks day everyone! I hope you had a great time. I am down from cold and fever so was in my bed all day :( but still got a chance to do my nails. I think I have an attachment to green polish as it makes me feel relaxed. I used stamping for his design and I hope you guys like it.
For this, I applied 2 coats of Zoya Shawn. Then using a Shany stamping image plate SH12 I stamped the shamrocks using Sally Hansen Color Quick Fast Dry Nail Color Pen in Green Chrome and China Glaze 2030. After that I applied green glitter in the middle of each shamrock.
Happy St. Patricks day everyone! I hope you had a great time. I am down from cold and fever so was in my bed all day :( but still got a chance to do my nails. I think I have an attachment to green polish as it makes me feel relaxed. I used stamping for his design and I hope you guys like it.
For this, I applied 2 coats of Zoya Shawn. Then using a Shany stamping image plate SH12 I stamped the shamrocks using Sally Hansen Color Quick Fast Dry Nail Color Pen in Green Chrome and China Glaze 2030. After that I applied green glitter in the middle of each shamrock.
Labels:
China Glaze,
Glitter,
Green,
Sally Hansen,
Shany,
Stamping,
Zoya
March 16, 2012
Black and White Challenge Day 6
Hello,
This is my sixth post for the Black and White Nail Challenge. The theme for today's nails was to create a manicure using a color base with something white. I am not feeling well today so I settled with a stamping manicure and I like how it turned out.
For this, I applied 2 coats of OPI I'll Take The cake. Then using the Shany (2012) image plate SH21 I stamped the design on all the fingers using Konad white stamping polish. After it dried I made a french tip using Essie Blanc. Then applied purple glitters along the french tip.
This is my sixth post for the Black and White Nail Challenge. The theme for today's nails was to create a manicure using a color base with something white. I am not feeling well today so I settled with a stamping manicure and I like how it turned out.
For this, I applied 2 coats of OPI I'll Take The cake. Then using the Shany (2012) image plate SH21 I stamped the design on all the fingers using Konad white stamping polish. After it dried I made a french tip using Essie Blanc. Then applied purple glitters along the french tip.
Labels:
Essie,
French Tip,
Glitter,
Konad,
Nail Challenge,
OPI,
Shany,
Stamping,
White
March 7, 2012
Black and White Challenge Day 3
Hello,
This is my third post for the Black and White Nail Challenge. The theme for today's nails was to create a manicure using a black base with some color. I have been thinking about making roses on my nails for a while now and this seemed like a perfect opportunity. These roses are super easy to make. I learned it from this video.
For this, I applied two coats of Wet N Wild Black Cream. Then using Zoya Sooki and Essie Blanc I made the roses using an orange wood stick. After it dried, I drew leaves using a green acrylic paint. After everything dried, I applied China Glaze Matter top coat. It looked kinda dull so I applied L.A. Colors green glitter on the leaves and little silver glitter on the roses. The roses had some texture so I went a step further and applied top coat on just the roses and leaves. I really liked how it turned out.
This is my third post for the Black and White Nail Challenge. The theme for today's nails was to create a manicure using a black base with some color. I have been thinking about making roses on my nails for a while now and this seemed like a perfect opportunity. These roses are super easy to make. I learned it from this video.
For this, I applied two coats of Wet N Wild Black Cream. Then using Zoya Sooki and Essie Blanc I made the roses using an orange wood stick. After it dried, I drew leaves using a green acrylic paint. After everything dried, I applied China Glaze Matter top coat. It looked kinda dull so I applied L.A. Colors green glitter on the leaves and little silver glitter on the roses. The roses had some texture so I went a step further and applied top coat on just the roses and leaves. I really liked how it turned out.
Labels:
Acrylic Paint,
Black,
China Glaze,
Essie,
Freehand,
Glitter,
LA Colors,
Matte,
Nail Challenge,
Wet N Wild,
Zoya
March 5, 2012
For Audrey with Whimsical
Hello,
I am the most creative person when it comes to giving title to my post. My mind just goes blank and I come up with creative names like 'For Audrey with Whimsical' :D I don't get it how people come up with creative names. Enough with jabbering, for today's post I'm using Revlon Whimsical which I won in a giveaway in February. You can check the post here.
For this, I applied 2 coats of China Glaze For Audrey. Then applied one coat of Revlon Whimsical. Whimsical consists of blue, pink and silver glitters of different sizes in a milky-blue polish. When you apply Whimsical just by itself it looks transparent with some glitters (1 coat) but when you apply it over any polish, it mutes down the color of that polish. I like how this combination turned out.
I am the most creative person when it comes to giving title to my post. My mind just goes blank and I come up with creative names like 'For Audrey with Whimsical' :D I don't get it how people come up with creative names. Enough with jabbering, for today's post I'm using Revlon Whimsical which I won in a giveaway in February. You can check the post here.
For this, I applied 2 coats of China Glaze For Audrey. Then applied one coat of Revlon Whimsical. Whimsical consists of blue, pink and silver glitters of different sizes in a milky-blue polish. When you apply Whimsical just by itself it looks transparent with some glitters (1 coat) but when you apply it over any polish, it mutes down the color of that polish. I like how this combination turned out.
February 24, 2012
Giveaway I won & Zmail
Hello,
Today I received not one but two mail packages. Awesome! First, I will start with the giveaway polishes that I won. Kristin from http://luminouslacquer.blogspot.com/ did her first giveaway on her Facebook page when she reached 50 likes. She mailed these beauties on Wednesday and I received them on Friday in a perfect condition. She also wrote a very cute note. Thank you Kristen and I love both the polishes. Also, it may surprise you to know that I do not own any Revlon or Nicole by OPI polishes. I had used Revlon in the past but do not have any in my present collection. This is going to be my first time trying Nicole by OPI.
Awesomeness in Bottle.
I also received my Zmail today. I ordered them when Zoya released its Valentine's Day promo. So I just paid a total of $8 for both of these polishes including shipping.
More awesomeness in Bottle.
All four polished that I received today.
Today I received not one but two mail packages. Awesome! First, I will start with the giveaway polishes that I won. Kristin from http://luminouslacquer.blogspot.com/ did her first giveaway on her Facebook page when she reached 50 likes. She mailed these beauties on Wednesday and I received them on Friday in a perfect condition. She also wrote a very cute note. Thank you Kristen and I love both the polishes. Also, it may surprise you to know that I do not own any Revlon or Nicole by OPI polishes. I had used Revlon in the past but do not have any in my present collection. This is going to be my first time trying Nicole by OPI.
![]() |
| Left: It's not me, It's Blue; Right: Whimsical |
Awesomeness in Bottle.
![]() |
| Revlon Whimsical |
I also received my Zmail today. I ordered them when Zoya released its Valentine's Day promo. So I just paid a total of $8 for both of these polishes including shipping.
![]() |
| Left: Zoya Dita; Right: Zoya Maisie |
More awesomeness in Bottle.
![]() |
| Maisie |
All four polished that I received today.
I will appreciate any suggestions or comments.
Thanks for looking.
Simran
February 23, 2012
Blue Squares and Glitters
Hello,
How is everyone doing? First, I am very excited that I won two polishes in a giveaway hosted by Kristin from http://luminouslacquer.blogspot.com/. She is a newbie (like me) and has a wonderful blog and a Facebook page so check it out and give love. I am waiting to receive and play with my giveaway polishes. Also, this is the first time I have won anything so :) :)
For this, I applied 2 coats of Zoya Caitlin. Then using a Red Angel image plate 103 I stamped the Squares using Ulta Salon Formula Wild Night. My alignment of stamping the squares is kinda off specially on my pinkie. I have an obsession of doing something extra on my accent finger so I applied three different colors (Silver, Navy Blue, and Turquoise) of square glitter in small empty squares. I applied these glitter squares individually rather that just piling it on as it gives it a much smooth texture.
How is everyone doing? First, I am very excited that I won two polishes in a giveaway hosted by Kristin from http://luminouslacquer.blogspot.com/. She is a newbie (like me) and has a wonderful blog and a Facebook page so check it out and give love. I am waiting to receive and play with my giveaway polishes. Also, this is the first time I have won anything so :) :)
For this, I applied 2 coats of Zoya Caitlin. Then using a Red Angel image plate 103 I stamped the Squares using Ulta Salon Formula Wild Night. My alignment of stamping the squares is kinda off specially on my pinkie. I have an obsession of doing something extra on my accent finger so I applied three different colors (Silver, Navy Blue, and Turquoise) of square glitter in small empty squares. I applied these glitter squares individually rather that just piling it on as it gives it a much smooth texture.
February 14, 2012
Valentine's Day Nails 12
Hello,
This is my twelfth and last post of the Valentine's Day series. For this design you will need acrylic colors, brushes and red glitter. I had so much fun doing this design and I hope you guys like it.
For this, I applied 2 coats of Zoya LC. On my accent finger I drew a teddy using acrylic paints. I followed the same layering steps as in my sixth Valentine's Day nails ( Click sixth if you want to see a layering tutorial). On my other fingers and thumb I applied chunky red glitter.
Labels:
Acrylic Paint,
Cartoon,
Coral,
Freehand,
Glitter,
Red,
Sponging,
Valentine's Day,
Zoya
February 8, 2012
Valentine's Day Nails 7
Hello,
This is my seventh post for Valentine's Day series. This is the most easiest design I have done in a couple of days other than stamping of course. You only need a couple of acrylic paints and brushes.
For this, I applied two coats of Zoya Jules. On accent finger made small hearts using red acrylic paint. I did not focus on drawing the same size hearts and drew them very randomly using the side of a flat brush. With the same brush I made some random leaves using green acrylic paint and then with a brown acrylic paint made branches. After everything dried I added red glitter on my tiny hearts.
This is my seventh post for Valentine's Day series. This is the most easiest design I have done in a couple of days other than stamping of course. You only need a couple of acrylic paints and brushes.
For this, I applied two coats of Zoya Jules. On accent finger made small hearts using red acrylic paint. I did not focus on drawing the same size hearts and drew them very randomly using the side of a flat brush. With the same brush I made some random leaves using green acrylic paint and then with a brown acrylic paint made branches. After everything dried I added red glitter on my tiny hearts.
February 7, 2012
Valentine's Day Nails 6
Hello,
This is my sixth post of the Valentine's Day series. I want to start this post by thanking Leslie of Polish Art Addiction. I have learned so much from her blog specially cartoon themed nail art. If you want to look at more cartoon nail art then click on the link above.
For this, I uploaded a step by step tutorial for you. I did not get it right the first time I tried. Heard of a phrase "Practice makes you perfect" well I am no where near perfect but with practice I did improved a little.
This is my sixth post of the Valentine's Day series. I want to start this post by thanking Leslie of Polish Art Addiction. I have learned so much from her blog specially cartoon themed nail art. If you want to look at more cartoon nail art then click on the link above.
For this, I uploaded a step by step tutorial for you. I did not get it right the first time I tried. Heard of a phrase "Practice makes you perfect" well I am no where near perfect but with practice I did improved a little.
Labels:
Acrylic Paint,
Cartoon,
Glitter,
LA Colors,
Red,
Sponging,
Tutorial,
Valentine's Day,
Wet N Wild,
White,
Zoya
February 3, 2012
Valentine's Day Nails 2
Hello,
This is my second post of the Valentine's Day series. It is a very simple design using stamps and I hope you guys like it.
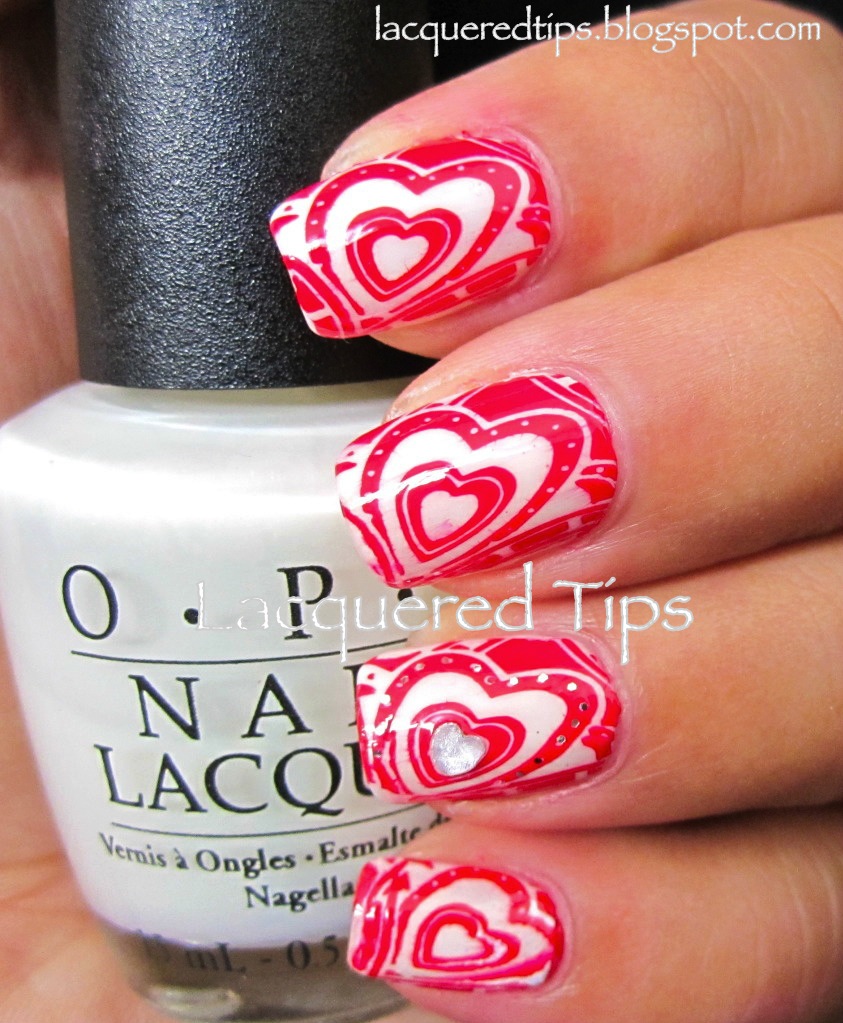
For this, I applied 2 coats of OPI Fit For A Queensland. Then using the Red Angel Plate 106 I stamped the heart design on all the fingers using Zoya Sooki. On the accent finder I added a silver heart rhinestone in the middle and small silver glitters on the big red heart outlining the small heart in the middle.
This is my second post of the Valentine's Day series. It is a very simple design using stamps and I hope you guys like it.
For this, I applied 2 coats of OPI Fit For A Queensland. Then using the Red Angel Plate 106 I stamped the heart design on all the fingers using Zoya Sooki. On the accent finder I added a silver heart rhinestone in the middle and small silver glitters on the big red heart outlining the small heart in the middle.
February 2, 2012
Valentine's Day Nails 1
Hello,
I mentioned in my last post that I will be doing a Valentine's Day theme nails for the next two weeks. This is my first mani in that theme and I hope you ladies enjoy it. I have also uploaded a step by step tutorial for you (I am so nice! :D).
Labels:
Acrylic Paint,
Glitter,
Pink,
Red,
Sally Hansen,
Tutorial,
Valentine's Day,
Zoya
Subscribe to:
Posts (Atom)